Monday, August 27, 2007

Connection to the past

A few years ago, I went through a phase where I was buying all kinds of vintage sewing patterns online. I haunted eBay, obsessively looking at anything close to my size (vintage ladies were small!). I collected quite a collection of patterns, ranging from 1920s flapper dresses to 1960s mod. I even have a pattern from the 1910s which I will probably never be brave enough to unfold.

I developed a particular love for the 1930s. The long, willowy models in the drawings, with their drapey, close-fitting, bias-cut dresses appealed to me hugely. Here are some 30s patterns from my collection:

Excuse the crappy photo!

Someday, I’ll show you my 40s and 50s patterns.

Now, the major difference I’ve noticed between these old patterns and modern patterns is that the old patterns are often just cut sheets of tissue paper, with some notches and holes punched in them, but nothing else: nothing printed on the pieces to indicate which piece is which, no instructions. Somewhere on the envelope there will usually be a diagram showing you the shapes of the pieces, so that you can at least sort them out yourself, but there are no layout diagrams. Most patterns will also at least indicate how much fabric they require, but that’s about it. For the 1930s sewer, used to making clothes for herself, no further instruction was necessary.

This modern sewer, however, was intimidated, and so I have never actually made anything from these patterns. I did once make a sample out of one of the patterns, but I never made it up in a fashion fabric, to wear.

So, when I became seized with the insane idea of making myself a coat for the wedding, I decided to make it difficult for myself, and tackle one of these patterns at last. I settled on this:


(Front of envelope on left, back on right)

I love the diamond shapes in the waist, I love the deep, luxurious collar. I love the fancy sleeve. It epitomizes everything I love about the 30s patterns: the long line, the details in the construction, the body-conscious fit. I've always had a thing for extravagant coats, and I could see this in a gorgeous head-to-toe cashmere/wool.

I decided I would make a muslin first. A muslin is a sample made in cheap fabric to work out the kinks before cutting the expensive fashion fabric. Since this coat uses 5 yards and the fabric I want costs $35 a yard, I thought I’d better know what I am doing before I put scissors to it!

This pattern is a “Pictorial” brand pattern. Pictorial is a company which doesn’t exist any more, but when I opened the pattern, I discovered to my delight what made it pictorial:


Instructions! With diagrams! And pictures! And all the pieces are printed with instructions and labeled as to what piece they are. It is almost as clear as a modern pattern.

The first step, with such fragile tissue pieces, was to trace the pieces onto sturdier pattern tracing paper:


Then I cut out the pieces from the muslin, and put it together. Here is the muslin:


I love the collar. The pattern is a bit big for me, but I think it will actually look lovely lapped a little further over and double-breasted. I like the hang of it (it looks very straight here, but has a nice A-line shape on me). I'll have to lengthen it to get the luxurious sweep I want, but otherwise I am very happy with it. With one exception.

You might notice from the above picture, that the muslin lacks the fancy sleeve of the pattern picture. Please, observe:


The sleeve on the far left is the fancy sleeve as dictated by the pattern. It's a cool construction, but I hated it on. It looks lovely in the picture, on that willowy model, but on my short body and my stubby arms it looked stupid. The two sleeves in the middle and the pile of pattern pieces on the right represent my attempts to draft a new sleeve. Note there are also two attempts on the muslin, making a total of five sleeves I’ve made, and I still am not happy with them.

At some point last week, as I began sleeve iteration #6, my sewing machine quit on me. It needed a break, and so did I. I’ve cleaned the machine, and it’s ready to go again. Having regrouped, I sat down to write this entry, and I downloaded this picture from my camera, taken early in the process:


What is this? This is two pattern pieces in the envelope which did not belong. Note, they are a much more typical 30s style: just a shape, with notches, but no printed markings. Nothing to indicate where they came from, or how they go together. I took a picture of them because I was fascinated by the idea that a woman way back in the 30s made an alteration to this pattern by using pieces from another pattern. She didn’t like the pattern as written, and so she went to another pattern, and poached a piece she liked, probably used it, then stuck it in this envelope to remember it. I loved this evidence that the pattern had been used, and this connection to someone seventy years in the past, making this coat just as I am.

Now, however, I am laughing. This woman in the 30s?

Also hated the sleeve.

Friday, August 24, 2007

In which I sublimate

I miss my sweetie. What's the answer? Crafts!

Alas, with my usual photographer off hiking and kayaking in Seattle, I lack pictures. But in the few weeks he has been gone, I have finished Norah Gaughan's Basalt Tank:


This is the project that convinced me to buy this book (Knitting Nature). It is totally cool, and a very quick knit (especially when you have nothing else to do but pine). I made some adaptations, so my version does not look exactly like this picture, but it still looks cool. I promise, I'll get someone to snap me at some point :-).

I've realized that this is the third Norah Gaughan design I have knit. I am so Norah Gaughan's b*tch.

Upon finishing it, I immediately cast on for the Cobblestone Pullover, from the current Interweave Knits:


Yes, I am knitting my sweetie a sweater. I feel very domestic working on it, all busy and Penelope-like (except I'm not unraveling it every night and beating off other suitors. Though I always thought Penelope was stupid: while she was weaving away, Odysseus was living it up with Calypso. Yeah, I know he was a "captive", but Odysseus is the trickster. He escaped everyone else, didn't he? Sheesh. My sweetie gets seven months, and if he doesn't come back, I'm taking my knitting elsewhere!). And of course, since we are engaged, the Sweater Curse supposedly does not apply. The Sweater Curse is knitting lore that holds that, if you knit your man a sweater but are not already engaged or married to him, you will break up immediately after you finish the sweater. So, you will have put all that money, time, energy, love, etc. into it, and it will walk away, never to be seen again. I've never been entirely clear if the loss of the man or the loss of the sweater was supposed to be more tragic :-).

I am about a foot into it (yes, that's a week's worth of knitting: why? I have nothing else to do), so of course I am bored and want to start something else. So, this morning (yes, this morning. Before going to work) I cast on this:


The Drop-Stitch Lace Top from Stefanie Japel's Fitted Knits. I recently ordered this and Annie Modesitt's Romantic Hand Knits from Amazon. I like both books very much, but this project seems tailor-made for a bit of purple/blue silk I have lying around.

Oh, and in the meantime? I have decided to make myself a coat for the wedding. A full-length, white winter coat, for the five or ten mintues I might be outside. No, I will not knit it (I'm not that crazy), I will sew it. So in between all the knitting, I have begun work on a muslin for the coat. I am using a vintage pattern from the 30's, and the sleeves are "giving me agita," as my sweetie would say.

I think that warrants a whole 'nother post.

Wednesday, August 15, 2007

Rings

So, my sweetie left for Seattle a week and a half ago. I miss him very much, but at least I am no longer angry with him for leaving :-).

Prior to his departure, we bought wedding rings. It’s early yet, but it’s something we wanted to do together, so, like the engagement photos, it had to be squeezed in.

We went back to the jeweler on Diamond Row that my sweetie bought my engagement ring from. I thought, going in, that I wanted something that would match my engagement ring exactly: it has a rather ornate decoration on the sides of the ring, featuring tiny diamonds and milgraining. It’s beautiful, very vintage-looking. I wanted something like this to match:
(Picture from wedding-band-ring.com)

The jeweler did not have anything exactly matching in stock, so she sent a runner to go find something. He took my engagement ring with him, which, let me tell you, freaked me out. I have no idea where he went; my sweetie kind of suspects he visited every other store on the street to try to buy something. Who knows? The little window into the diamond business this whole experience has given me is completely fascinating.

Anyway, he came back with a “casting”—that is, a white gold ring setting with no diamonds in it. It was also a really dull gray color, since it hadn’t been polished. This is how the rings arrive from the manufacturer, and the diamond stores then set diamonds in them, polish them, etc. It was totally cool, and really ugly :-). It was very similar to my engagement ring, but it was very hard for me to get a good idea of what the two rings would look like on—the casting was kind of chunky, and it was hard to tell if this was because the ring was fat, or because, without any diamonds set in it, the little prongs for them stuck out too much. And the dull gray color just wasn’t appealing. I guess I can’t visualize that well.

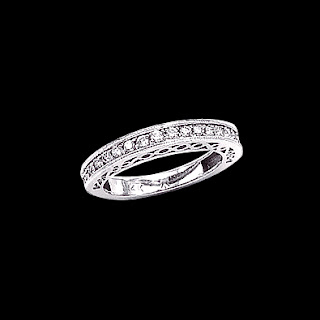
So, the jeweler offered a few other options. In the end, we picked a band with a row of tiny diamonds on top, and instead of diamonds in the side, it has some decorative scrollwork. More like this*:


(Picture from diamonds.com)


It’s not a perfect match, but it’s a slim little band, and looks nice snuggled up against my engagement ring, without distracting from it. I think they will be comfortable to wear together.

My sweetie picked a very plain yellow gold band. He is not a jewelry guy, and had literally no idea what he wanted the band to look like. When the jeweler showed him a few things, he very quickly narrowed it down to just about the plainest thing you could pick: 5 mm, comfort fit rounded yellow gold band. It was very him: he is not an adornment type:

(Picture from weddingbands.com)

Later, he confessed that part of why he liked the yellow gold is that it reminds him of his dad’s wedding band. Aww!

As I was trying on rings, I saw, to my acute embarrassment, that my engagement ring, after six months of wearing it, had become dirty to the point of looking gray next to the shiny new rings. So the jeweler sent me upstairs to have the ring cleaned and redipped in rhodium. This is the second time I’ve sat in a little room where jewelers were working away behind locked doors (the first was when I needed to get my engagement ring sized), and it was still totally cool to me. I love knowing that there are still thriving craft industries in Manhattan: we’re not all office and restaurant workers. Even better, the jeweler told me to come back the week before the wedding so that she could have it cleaned again to look beautiful in the pcitures!

* (I do not have pics of our actual rings because, to save the sales tax, they’ve been shipped to my sweetie in Seattle.)

Monday, August 13, 2007

Nana's Shawl

A friend asked me to write up a pattern for Nana's Shawl, which I adapted from two K nitty patterns and the traditional stitch pattern, Feather and Fan. Since I love this shawl, I thought I'd post the pattern here. My very first "published" pattern!

NANA’S SHAWL
Adapted from Tie One On and Hip in Hemp.

Yarn: Lorna’s Laces Shepherd Worsted, color Iris Garden, 3 skeins.
Gauge: 25 stitches = 4” in pattern
Needles: size 7 long (52”) circular needle, knit back-and forth; size 6 straight or circular needles.

Approximate finished measurements: 37” wide at the top, 45” wide at the bottom, not including ties. 15” deep. Ties are 8.5” x 4”.

Modified Feather and Fan stitch pattern:

Row 1: Knit
Row 2: Purl
Row 3: Pattern row A or B, as indicated
Row 4: Knit

Pattern row A is the increase row, B is the static row. N is variable. You work the Modified Feather and Fan stitch pattern once with row A, then four times with row B, then begin again with A, changing the value of N as indicated in the instructions.

Pattern row A: *[k1, yo] 3 times, kN, [k2tog] 4 times, kN, [yo, k1] twice, yo; repeat from * to end. Note that the last stitch of the row cannot be a yo, so instead kf/b in the last stitch.

Pattern row B: *[ k1, yo] 3 times, kN, [k2tog] 6 times, kN, [yo, k1] twice, yo; repeat from * to end. Note that the last stitch of the row cannot be a yo, so instead kf/b in the last stitch.

Instructions:
With larger needles, cast on 170 stitches; place marker every 17 stitches.

Setup rows:
Row 1: Knit
Row 2: Knit

Row 3: Begin Modified Feather and Fan stitch pattern

Row 5: Pattern row A; N = 2. 19 sts between markers
Rows 9, 13, 17, 21: Pattern row B; N = 1

Row 25: Pattern row A; N = 3. 21 sts between markers
Rows 29, 33, 37, 41: Pattern row B; N = 2

Row 45: Pattern row A; N = 4. 23 sts between markers
Rows 49, 53, 57, 61: Pattern row B; N = 3

Row 65: Pattern row A; N = 5. 25 sts between markers
Rows 69, 73, 77, 81: Pattern row B; N = 4

Row 85: Pattern row A; N = 6. 27 sts between markers
Rows 89, 93, 97, 101: Pattern row B; N = 5

Row 105: Pattern row A; N = 7. 29 sts between markers
Rows 109, 113, 117, 121: Pattern row B; N = 6

(Don’t forget to knit row 122, the final row of the Modified Feather and Fan pattern)

Row 123: Knit
Row 124: Knit

Bind off loosely knitwise.

For the ties:

Pick up and knit 42 stitches along one end. Pick up one or two stitches into the top and bottom edges, so that the ties flow organically from the main body of the shawl.

Next row (WS): Purl
Next row (RS): [k1, k2tog] 14 times. 28 sts remain
Next row (WS): switch to smaller needles, work in 1 x 1 rib, slipping the first stitch of every row.

Work until the tie measures 8.5”. Bind off in pattern.

Repeat for the second tie.

Block gently to open up yarnovers.

Saturday, August 04, 2007

A dress for Wei Zhen

Last week, my parents were visiting. On Friday, my mom and I took a trip down to Chinatown to order a qipao. I have no idea what the difference between a qipao and a cheongsam is; I assume it is Mandarin vs. Cantonese. Here's a picture of one:


The Chinese bride apparently changes outfits during her wedding many, many times. The Chinese-American bride most commonly changes only once, at some point during the reception, from her white dress into a red qipao.

I, however, love my white wedding dress, bought in a frenzy at Filene's, so I couldn't decide whether to change. I had some mixed feelings about making the wedding too Chinese--my sweetie is not Chinese, and I am not exactly deeply connected to my Chinese heritage. For a while it really seemed like my Caucasian friends were way more eager for me to do it than I was, which made me even more reluctant: I am not particularly interested in turning my wedding into a miniature "It's a Small World" ride for my white friends and in-laws.

In the end, I left it up to my mother, because if my wedding is going to be at all Chinese, it will be for my parents' benefit. After some waffling, she decided she wanted it. So, off to Chinatown we went.

"Of course" we are having one made for me (you can buy them ready-made, but my mother didn't seem to even consider this). This necessitated much measuring, because the qipao is skin-tight. The dressmaker measured around my arm at three different points. She measured the distance from my collarbone to my nipple. She measured the exact position of the slits up the sides. She wrote them all down on a little chart and drew a rough picture of the finished dress:
If you can read Chinese, you can see what egregious measurements the dressmaker has written down for my bust and wasit. I can only say two things: 1) she measured me over my clothes! and 2) I will lose some weight before the first fitting in December.

The scraps are swatches of the fabrics we chose. The red is a gorgeous brocade with a pattern of phoenixes and dragons (a very traditional wedding combo: the phoenix represents the Empress and the dragon the Emperor). The shop had dozens of red fabrics (I ignored the myriad of other colors because red is the Chinese wedding color) and we draped half a dozen over me before deciding on this one. The gold is the fabric she'll use for piping around the edges. I admit once I was playing with fabric, I was on board: I love the idea of having a dress made just for me, and when else will I get to wear opulent red silk from head to toe? I can't wait!